sewage treatment plant installation
Let us take all of your worries out of your sewage treatment plant installation.
Approved Installation Service For The Bio-Pure Sewage Treatment Plant
Full factory approved installations are available either directly or through factory approved installation companies, offering unparalleled service and value for money.
Our approved installers can supply and install a Bio-Pure sewage treatment plant to suit your specific requirements, please ask for a list of our approved installers in your area.
We can offer a supply and installation service to meet your requirements. We can do as much or as little of the job as you prefer.
Our fully insured and factory trained technicians can completely install your Bio-Pure Sewage Treatment Plant, taking all of the worry out of your sewage treatment plant installation.
We will provide a full quotation for the installation before work commences and the price we quote is the price you pay.
Do it yourself sewage treatment plant installation
Installing the Bio-Pure Sewage Treatment Plant is quick and easy. This can be self installed and we offer free telephone support for your peace of mind.
Sewage treatment plant installation Diagram (the illustrations below are a representation of a standard small treatment system)
Standard Installation excluding high water table areas and Bio-Pure 6-10
1

The Bio-Pure should be at least 7m from a dwelling and not too close to trees, because of the roots.
2
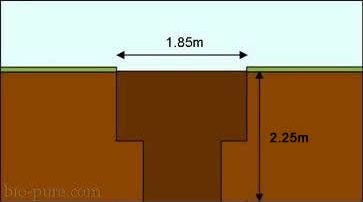
Excavate a hole 2.25m deep by 1.85 m wide using a digger. Ensure the hole is narrower at the bottom.
3

Lower the Bio-Pure into the ground using the digger. Install anchoring kit now, if required.
4

Dig the appropriate depth hole for the inlet invert and make the connection. Ensure the unit is level.
5

Backfill the unit to approx. 700mm, using pea gravel. Partly fill the unit with water.
6
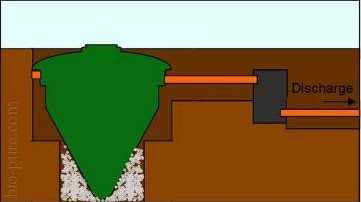
Make the outlet connection (via sample chamber if necessary). Complete backfill and filling with water.
7
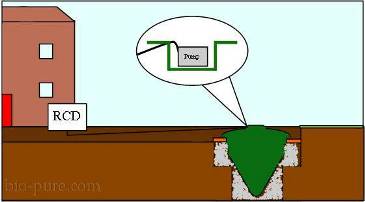
Make the electrical connection from an RCD and use a double outside socket.
8

Sit back and relax!
Full Instructions for a small Bio-Pure sewage treatment plant
Below are the instructions that we provide for installing the Bio-Pure Sewage Treatment System. The instructions are simple to follow and we provide free telephone back up. A keen self builder would be able to easily install the Bio-Pure Sewage Plant.
Standard Installation excluding high water table areas and Bio-Pure 6-10
1. (For Bio-Pure 1 & 2) Excavate a hole 2.1m round by 2.25m deep tapering the last 1.2m ensuring the soil at the base of the hole is firm and undisturbed. If not possible, compact sand or pea gravel into base until desired level is obtained. For Bio-pure 3, 4 & 5 excavate a hole 2.4m round by 2.7m deep tapering the last 1.5m.
(NB. Try to follow shape of unit as much as possible)
2. Remove the service hatch and the compressor box housing section of the unit by means of cutting the cable ties and removing the two bolts below lid (note – care should be taken that these sections are not dropped, causing damage) and retain in safe place.
3. Lift the unit by means of strapping attached through the outlet connection and around the inlet coupling, (outside unit) ensuring there is no water remaining in the unit prior to lifting.
4. Lower the unit into the hole checking that the inlet and outlet connections on the unit will align with the corresponding connections.
5. If you are using anchoring kit, remove unit and install now.
6. Level the unit in the hole and begin backfill around the base of the unit to a depth of approximately 700mm (you have the option at this stage of circulating the wedges with a concrete ring to ensure no lifting if the ground is subject to moderate waterlog). Fill the unit with a corresponding amount of water to help stabilise the unit
Note – backfill material must be 20mm to dust scalpings to ensure no damage is caused to unit.
7. Plug outlet pipe temporarily.
8. Fill the outlet chamber with water until it flows over the top of the weir.
9. Level the unit until the surface of the water in the outlet chamber is even around the circumference.
10. Continue backfill around the unit whilst simultaneously bringing the water level up within the unit full, stopping backfill just below inlet and outlet connections.
11. Connect inlet and outlet connections to sewer pipes.
12. Attach the blower pipe to the blower tube by means of the jubilee clip supplied.
13. Securely bolt the top section to the base unit by means of the eye bolts.
14. Continue backfill up to ground level.
15. Place the compressor housing on the floor next to the unit. Pass the blower pipe through the rubber grommet in the compressor housing and loosely drop box back into the tank (ensure enough pipe is left in the body of the unit so as to be able to remove the compressor housing for servicing).
16. Drill a hole into the neck of the tank and pass electrical cable through hole and through the rubber grommet in the compressor housing. Secure compressor housing using original fittings (ensure enough cabling is left in the body of the unit so as to be able to remove the compressor housing for servicing).
17. Secure blower pipe to compressor/s by means of the jubilee clip supplied.
high water table area?
high water table Supplement
If the Bio-Pure sewage treatment plant is installed in wet ground the top and bottom parts of the unit should be sealed by means of a water tight mastic sealant and the unit should be anchored by means of concrete or anchorage pins.
Anchorage by Concrete
The Bio-Pure Domestic Sewage Treatment Plant has 4 anti-flotation wedges positioned on the sides. For moderately wet ground these can be covered in a lean mix of concrete to act as an anti-flotation ring.
IN SEVERE WET GROUND THE ENTIRE UNIT SHOULD BE BURIED IN CONCRETE UP TO THE INLET AND OUTLETS OR THE ANCHORAGE PIN METHOD SHOULD BE USED.
NB. When using concrete the unit should be filled with water at the same rate as concrete is poured.

High Water Table Anchorage – Dry Pin Method
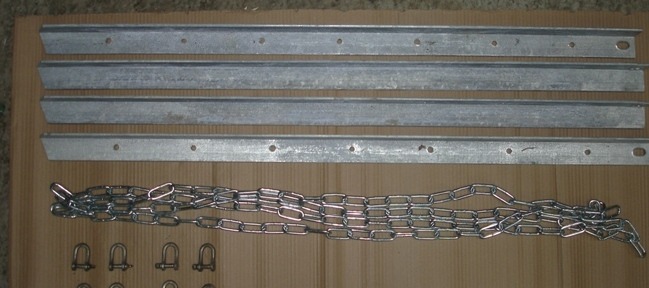
1. Insert the steel anchorage pins by hammering them horizontally (90 degrees) to the walls of the excavation into the undisturbed ground at a depth of 1200 mm (from the top). The pins need to be inserted leaving 300 mm protruding into the excavated area.
2. Connect a length of galvanised chain into the hole in the end of each pin using a shackle. Take the loose end to the top of the excavation and secure temporarily.
3. Continue to install tank as per fitting instructions.
4. When the Bio-Pure Domestic Sewage Treatment system is fully installed, insert eye bolts into the down position i.e eye bolt at the bottom, nut at the top. Attach the loose end of the chain into the eye bolts by means of shackle, adjust and tighten each eye bolt to take up any slack in chain – do not leave any slack in chains as tank may move.
5. Continue to back fill to desired level.
High water table anchorage
4 x 1200mm galvanised steel angle irons (50mm x 50mm x 6mm) each with a point at one end and a 13mm hole at the other.
8 x galvanised steel ‘D’ shackles.
4 x 1200mm long, 6mm diameter welded link galvanised steel chain.